Turning Photograph Into Cartoon-Style Picture (Part 2 - Coloring the Skin)
/
0 Comments
Turning Photograph Into Cartoon-Style Picture (Part 2 - Coloring the Skin)
This is part 2 of tutorial on turning photograph into cartoon-style picture. (If you haven't done so, please readthe first part of the tutorial).
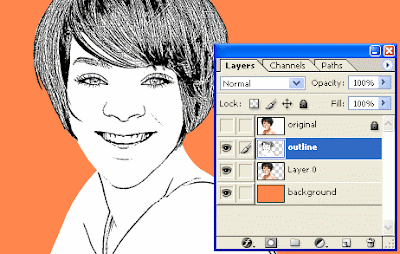
On the first part of the tutorial, we have made the outline of the cartoon photo. Here's what we got so far:
Now begin...
Step 4: Coloring the Skin
Our next step is coloring the skin.
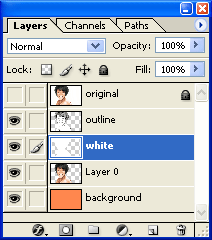
1. Select the 'outline' layer. Press Ctrl-J to duplicate the layer (or drag and drop it to the 'create a new layer' button). Rename the new layer to 'white'.
2. Let's make this layer pure white.
Choose menu: Image :: Adjustments :: Brightnness/Contrast...
Move the 'Brightness' slider all the way to the right (+100) and the 'Contrast' slider all the way to the left (-100).
Click OK.
3. Drag the 'white' layer below the 'outline' layer.
4. Change the blending mode of 'outline' layer to 'Multiply'.
5. Press 'd' to set the foreground color to black and background color to white.
6. On the Layers Palette, select the 'white' layer.
7. Click the 'Create new fill or adjustment layer' at the bottom of Layers Palette. On the popup menu, choose 'Solid Color...'. A 'Color Picker' dialog box will be displayed.
 at the bottom of Layers Palette. On the popup menu, choose 'Solid Color...'. A 'Color Picker' dialog box will be displayed.
On the 'Color Picker', pick a creamy brown color. This color will be used for the skin color. (I picked #FAD594 for the skin. You don't need to be too picky here. We can change the color easily later whenever we need to).
8. Now we have something like this.
10. Rename our new layer to 'skin'.
11. Create a clipping mask between 'skin' layer and 'white' layer. Press Ctrl + G while the 'skin' layer is still selected.
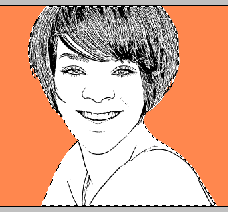
12. On the 'Layers Palette', click on the 'outline' layer while holding (pressing) the Ctrl button. This will tell the ants to march around Rihanna. Oops, I mean, this will put a selection mark around Rihanna.
15. Press Ctrl + D to deselect the selection area.
Go on to the next part of the tutorial.


