
Turning Photograph Into Cartoon-Style Picture-Part1-Rihanna Picture
/
0 Comments
Turning Photograph Into Cartoon-Style Picture-Part1-Rihanna Picture
Here's the original photo

And here's the final result of this tutorial

First of all, download the original picture of Rihanna here.
 1. Open the original photo in Adobe Photoshop. (In this tutorial I use Adobe Photoshop CS. I haven’t got other versions of Adobe Photoshop, but I guess the entire steps described in this tutorial can be applied on any version of Photoshop)
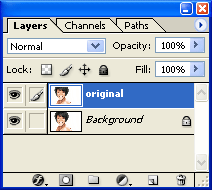
2. On the 'Layers Palette', drag and drop the 'background' layer to the 'New Layer' button to duplicate it.

3. Lock this layer (click the 'lock all' button ), and turn the visibility of this layer off.


5. Create a new layer. Rename it into 'background'. We will use it as background layer for our cartoon photo. Fill it with orange using Paint Bucket tool.

6. Move the layer to the bottom.


Our next step is to create the outline of the picture.

 3. Make sure color palette is black for the foreground and white for the background. (Press 'd' if they're not).
 4. Turn the picture into outline using photocopy filter.
The value for 'Detail' depends on the picture. Most of the time a value of '2' gives the best result.
 5. Turn the outline into solid black lines.
Wondering how those guys on the internet turn photograph into a nice cartoon-style picture? Eager to make one yourself but don't know how to do it? Looking for an Adobe Photoshop tutorial on it but couldn't find any that satisfies your need?
Search no more. You've already found it!
Now here's how to turn your favorite photo into a cartoon photo.
Be aware though, a photo cartoonization process (or cartooning, some people may say) is a patience-demanding job. But the result is very much satisfying.
For this tutorial we will use a photo of Rihanna.
Here's the original photo
And here's the final result of this tutorial
First of all, download the original picture of Rihanna here.
And start to work.
Step 1: Preparing the Canvas
On choosing the photo to be cartoonized, choose a clear and sharp photo with the face of the person clearly seen. Blur, out of focus, or under-exposed photo is a bad choice. The larger the resolution of the photo is the better
2. On the 'Layers Palette', drag and drop the 'background' layer to the 'New Layer'
Rename the new layer to 'original'. (To rename a layer, right-click on the name in the Layers Palette and select Layer Properties).
We will keep the original photo (the 'original' layer) intact in case something ''wrong' happened in our cartooning activity and need the original picture.
3. Lock this layer (click the 'lock all' button ), and turn the visibility of this layer off.
4. Double click the 'background' layer. Click 'OK'.
5. Create a new layer. Rename it into 'background'. We will use it as background layer for our cartoon photo. Fill it with orange using Paint Bucket tool.

6. Move the layer to the bottom.
Now our layers will look something like this:

Step 2: Removing Unwanted Areas of the Picture
Isolate the object. Clear out all unwanted parts of the photograph. Use Pen Tool for this purpose. If you've never used this tool previously, I suggest you to take a look at Melissa Clifton tutorial first.
Take the Pen Tool, create a path around the object (Rihanna for this case), load path as selection (ctrl + Enter), inverse the selection (ctrl + shift + i), cut (del), then deselect the selection (ctrl + D).
Note: You could use Eraser Tool, Magic Eraser Tool, or Background Eraser Tool which is simpler and faster for this purpose, but the result won't be as professional.
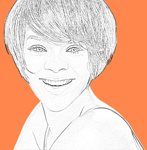
Step 3: Creating outline of the picture

Rename it to 'outline'.

2. Menu: Image :: Adjustments :: Shadow/Highlight...
Click OK.
Click OK.
This step is not a must. But most of the time it will improve the clearness of the outline.
3. Make sure color palette is black for the foreground and white for the background. (Press 'd' if they're not).
menu: Filter :: Sketch :: Photocopy...
Set 'Detail' to 3.
Set 'Darkness' to 8.
Click 'OK'
The value for 'Detail' depends on the picture. Most of the time a value of '2' gives the best result.
Experiment with this setting. The goal is to make the outline as detail as possible so we can recognize the result as Rihanna, but not over-detailed that the outline becomes 'dirty'.
 5. Turn the outline into solid black lines.
menu: Image :: Adjustments :: Threshold...
Turn the slider right and left, experiment with it, until the preview displays the best outline you can get (a compromise between 'detail enough' and 'clean enough').
Click OK when you're satisfied with the result.
That's it. Now we're done with the outline.
Here's the result so far..
Next, we will apply some shading to give depth to the picture and then colorize it.
Go on to the next part of the tutorial.


