Showing posts with label Photoshop totorial. Show all posts
Snow on Text
This tutorial teaches you how to create nice looking snow effect on your text, you can use the effect on christmas themed graphics..

To start this tutorial, create a new document and fill the background with a black color, at the layer pallete click right on black background, blending options change the color.

in gradiant change the color 
1.2c99ed
2.00369a


after blending options-----> gradiant overlay
Then use your type tool to type in your text.
------------------------------------------------------------------------------------------------------------------------------------------------------------------
                                                                               

 Select the lasso tool.

Then draw your selections on top of your one of your letter. This will be your snow, so make it look runny/dripping from the top down.

               
Now create the same type of selection for the rest of your text, but do this by "adding" to the selection. To add to selection, in the selections' menu bar, select the "Add to Selection" button.
 

 This is the most time consuming part for this tutorial, take your time to create some nice dripping selections. If you accidentally make a bad selection, just press CTRL+Z to undo that step.

------------------------------------------------------------------------------------------------------------------------------------------------------------------


 Switch to your Channels pallette (Windows-Channels) then create a new channel by clicking on the "new channel" icon at the bottom of the pallette.

Press "D" to reset your your colors. then select the Paint bucket tool,  and fill in the selection with white.


------------------------------------------------------------------------------------------------------------------------------------------------------------------

Press CTRL+D to deselect your selection.

Then go to Filter » Blur » Guassian Blur
Radius: 3px

Now go to Image » Adjustments » Levels
Move your levels sliders so the image is sharp and smooth.
                                                                                    
------------------------------------------------------------------------------------------------------------------------------------------------------------------

Switch back to your layer's pallette, create a new layer.

Go to Select » Load Selection, in the load selection pannel, in the channel field, select Alpha 1.
 
Then fill in the selection (on the new layer) with white. Now you can press CTRL+D to deselect.
------------------------------------------------------------------------------------------------------------------------------------------------------------------

Add some shade to the snow, by adding a bevel emboss style to it.

So go ahead and add "Layer » Layer-Style » Bevel Emboss" to the snow layer.

------------------------------------------------------------------------------------------------------------------------------------------------------------------
Now, you can just use your own creativity to add layer styles/background color to your image, but if you want to create what i've done, apply the following layer styles to the original text layer.
(note: You may need to adjust a few things with the settings because these settings have different effects depending on the size of the text)


Inner Shadow

Bevel and Emboss
Gradient Overlay

Stroke
------------------------------------------------------------------------------------------------------------------------------------------------------------------
Now create a new layer in between your text layer and snow layer.

Press D to set your foreground color white, then select your brush tool and set the brush size to about 27, and set it's hardness to about 70% (Set this in the "Brush" Pallette)

------------------------------------------------------------------------------------------------------------------------------------------------------------------

Now just paint underneath your text so it looks like snow ground.

That's it, add some gradients to your background or whatever....

DOWNLOAD SNOW HERE


------------------------------------------------------------------------------------------------------------------------------------------------------------------
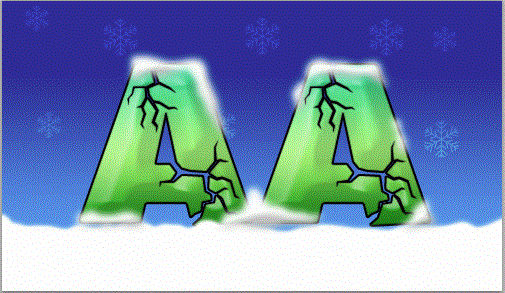
Final Image

Assalamualaikum dan salam sejahtera

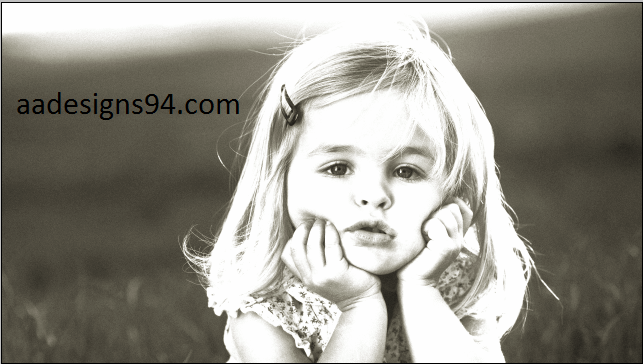
Pada kali ini aadesigns94  ingin berkongsi sedikit ilmu tentang photoshop cara menukar warna rambut. Kini tidak perlu lagi dilakukan pengecatan rambut pada model untuk mendapatkan sebuah gambar dengan warna rambut yang diinginkan. Dengan adanya Photoshop, mengganti warna rambut dapat dilakukan dengan sangat mudah dan cepat. Sebenarnya banyak cara untuk melakukan perubahan ini. Tapi disini saya akan mencubanya dengan menggunakan efek dari Hue/Saturation. Untuk mencubanya, silakan download dan buka foto di bawah ini ke dalam Photoshop.

Setelah anda download gambar di atas, Anda buka dalam Photoshop, buatlah selection di sekitar rambut dengan menggunakan Lasso Tool (L). 


Tekan pada ikon Image >Adjustment  > dan pilih Hue/Saturation.


Pada ruangan palete Hue/Saturation, gerakkan slider Hue untuk menentukan warna yang diinginkan, disini saya ingin memberikan warna hijau dengan nilai Hue +72. Jangan lupa klik ikon Clip to the layer.


Seterusnya anda hendaklah mengubah Blending Modenya menjadi warna untuk lebih menyatukan warna dengan rambut. Dan lakukan masking dengan cara, pilih Brush Tool (B) dan sapukan Brush dengan warna hitam ke bagian wajah si model yang terkena efek dari Hue/Saturation. Lakukan ini dengan sangat teliti agar mendapatkan hasil yang kualiti dan realistis.

sebelum


Begitu cepat dan mudah bukan? Sekarang cuba Anda mengantikan lagi warna rambutnya dengan warna sesuai keinginan Anda. Goodluck!
Here is a quick and simple way to turn your photo into an old photo.

If you want a quick and easy way to do photo retouch online for free, be sure to take a look at pycture.com. A Free online Photo Retouch and editing tool.

First of all, open up the photo you want to edit. Make sure to make up a backup copy of your original before working on it.

Here is what i'll be working with.


download here


First, lets turn the photo in black and white, go to Image » Adjustments » desaturate.

Then apply some brightness/contrast to it, giving the image that over-exposed look. so go to:
Image » Adjustments » Brightness and Contrast. I set 20 for brightness, and +30 for contrast. You may need to adjust this slightly on your image though.


Now add some grains to the photo to give it the old look. Go to Filter » Artistic » Film Grain.
Now, for these settings, you can adjust it according to your taste, I set mine at:
Grain: 3, Highlight Area: 2, Intensity: 4


Next, add some of those old/brown look that you see on all the old photos, so create a NEW LAYER, and fill it with: #8A681B, now set its Blending mode to: Soft Light
Opacity:45% 


That's it, Enjoy :)

In this Photo Retouching tutorial, we’ll look at one of the most amazing and time saving photo retouching tools available, the Spot Healing Brush, the first of three image "healing" tools in Photoshop. The Spot Healing Brush was first introduced in Photoshop CS2 and, like the other two healing tools (the standard Healing Brush and the Patch Tool), it’s essentially a texture replacement tool, meaning that it tries to create a seamless repair by replacing damaged or unwanted texture from one area in an image with good texture from another area, without changing the problem area’s original color or brightness values. What makes the Spot Healing Brush so amazing and fast is that it does this with almost no effort from us!
Download our tutorials as print-ready PDFs! Learning Photoshop has never been easier!
Both the standard Healing Brush and the Patch Tool need us to tell them which area of good texture we want to use to replace the bad texture with, but the Spot Healing Brush makes the decision all on its own. In most cases, all we need to do is click on a problem area with the Spot Healing Brush and Photoshop repairs it instantly, almost like magic! It works by choosing new texture from the area surrounding the spot we clicked on, and it usually does a great job as long as we remember that the name of the tool is the Spot Healing Brush, not the Huge Problem Area Healing Brush or the Click And Drag Me All Over The Image And Expect Miracles Healing Brush. The Spot Healing Brush works best on, well, little spots. In this tutorial, we’ll see how to use it to quickly and effortlessly remove pimples and other minor skin blemishes, but it’s also great at removing things like dust, dirt and mold and repairing small scratches.
Let’s get started!

Making Fast Even Faster With Keyboard Shortcuts

As we’ll see in a moment, the Spot Healing Brush works fast, but a few simple keyboard shortcuts will speed things up even more. To zoom in on the image, hold down Ctrl+spacebar (Win) / Command+spacebar (Mac) to temporarily access the Zoom Tool and click on the spot you need to zoom in on. To zoom out, hold downAlt+spacebar (Win) / Option+spacebar (Mac) and click. To scroll around inside the image when you’re zoomed in, hold down the spacebar by itself to temporarily switch to the Hand Tool, then click and drag to move the image around.
For best results with the Spot Healing Brush, you’ll want to use a brush size that’s just slightly larger than the area you’re trying to fix, which means you’ll usually need to change your brush size quite often as you make your way from one problem spot to the next. The fastest way to change your brush size is with the left and right bracket keys on your keyboard. Press the left bracket key ( [ ) to make the brush smaller or the right bracket key ( ] ) to make it larger. Also, since the Spot Healing Brush chooses the new texture on its own, sometimes it makes a mistake. When it does, simply undo the step by pressing Ctrl+Z (Win) / Command+Z (Mac), then try again.
For this tutorial, I’ll be using the Spot Healing Brush to quickly remove some distracting pimples from the girl’s face in the photo below, but the technique is the same no matter what it is you’re trying to remove or repair as long as the area is small enough for the Spot Healing Brush to be effective. I’ll be using Photoshop CS4 here, but any version from CS2 onward will work:
A teenage girl with typical teenage skin problems.
Let’s get started!

--------------------

Step 1: Add A New Blank Layer

With the photo newly opened in Photoshop, we can see in the Layers palette that we currently have one layer, the Background layer, which is the layer our image is sitting on:
The Background layer contains the original image.

Even though our goal is to make the original photo look better, we still want to protect the original image, so let’s add a new blank layer above the Background layer. We’ll do all of our spot healing work on this separate layer. Click on the New Layer icon at the bottom of the Layers palette:
Add a new layer by clicking on the New Layer icon.

Step 2: Rename The New Layer

Photoshop adds the new blank layer above the Background layer, but by default, it names the layer “Layer 1″. That doesn’t tell us much about what the layer is being used for, so double-click directly on the layer’s name in the Layers palette and rename it spot healing. It’s not uncommon when retouching images to end up with lots of layers, and giving each one a descriptive name makes it easier to keep them organized. Press Enter (Win) /Return (Mac) when you’re done to accept the new name:
Rename the new layer “spot healing”.

Step 3: Select The Spot Healing Brush

Select the Spot Healing Brush from the Tools palette. You’ll find it grouped in with the other healing tools. If one of the other tools is showing in place of the Spot Healing Brush, click on the tool and hold your mouse button down for a second or two until a small fly-out menu appears, then select the Spot Healing Brush from the menu:
The Spot Healing Brush is grouped in with the other healing tools.

Step 4: Select The “Sample All Layers” Option

By default, the Spot Healing Brush works only with the layer that’s currently selected in the Layers palette, which will cause us some problems if we try to use it right now since we have a blank layer selected, which means that all we’d be able to do is replace nothing with different nothing. We need to tell Photoshop to look at the image on the Background layer as well. To do that, select the Sample All Layers option in the Options Bar along the top of the screen:
Make sure “Sample All Layers” is selected in the Options Bar.

Step 5: Click On The Problem Spots To Heal Them

With the Spot Healing Brush and the Sample All Layers option selected, all we need to do now is click on problem areas in the image to fix them! I’ll zoom in on an area of the girl’s face so I can see the problem spots more clearly, then I’ll move my brush cursor over one of the pimples and adjust my brush size with the left or right bracket key so it’s just slightly larger than the pimple itself:
Use the keyboard shortcut to make the brush cursor a bit larger than the problem spot.
I’ll click on the pimple with the Spot Healing Brush, and just like that, it’s gone, replaced with good texture from somewhere in the surrounding area:
One click is all it took to remove the pimple.
As I mentioned earlier, sometimes the Spot Healing Brush can make a mistake, so if that happens, just press Ctrl+Z(Win) / Command+Z (Mac) to undo it and try again. Each time you try again, you’ll get a different, random result. I’ll continue clearing up other pimples in the area by moving my brush over them, adjusting its size with the left or right bracket key, and clicking:

Pimples? What pimples?
For problem areas that don’t fit easily into the round shape of the brush cursor, like small scratches or oddly-shaped skin blemishes, simply click and drag over them, again keeping the brush as small as possible. Here, we see a longer, narrow row of pimples just below the corner of the girl’s mouth:
Not all problem areas can fit inside the round brush cursor.
To heal this area, I’ll click and drag a short stroke over it, starting just below the pimples and moving upward. As you drag, it will look as if you’re painting over the area with black. The color is only temporary so you can see the area you’ve covered:
Dragging with the Spot Healing Brush looks like we’re painting with black.
When you release your mouse button, the black color disappears and the area is healed:
For best results, use short brush strokes when you need to click and drag across an area.
The direction you drag in can make a big difference in the results because Photoshop favors the area you started dragging from when it looks for replacement texture. If you can’t seem to get the Spot Healing Brush to work no matter how many times you drag over the problem, try dragging from a different direction, and whenever possible, begin dragging from the cleanest area with the largest amount of useable image data.
The Brush Modes
If you’re using the Spot Healing Brush to remove acne or other skin problems as I am here, you’ll often get even better results by changing the Brush Mode in the Options Bar from Normal (the default setting) to Lighten:
Try the Lighten brush mode when fixing skin problems.
With the brush mode set to Lighten, Photoshop will only replace pixels that are darker than the good texture data. Since pimples and other skin blemishes are usually darker than normal skin tone, only the pimple or blemish itself gets replaced, leaving more of the original image surrounding it intact. If a blemish happens to be lighter than the normal skin tone, use the Darken mode. You can quickly switch between all of the brush modes for the Spot Healing Brush from your keyboard by holding down the Shift key and pressing the + or - keys.
Proximity Match and Create Texture
Directly to the right of the brush mode in the Options Bar are two additional options, Proximity Match and Create Texture. Proximity Match is the default setting and with it selected, Photoshop looks for good image data surrounding the problem area you’ve clicked on and randomly selects texture from the good area to replace the bad texture with. Sometimes though, there simply isn’t enough good image data to use and no matter how many times you try, the Spot Healing Brush fails miserably. When you find yourself in this situation, try selecting the Create Texture option. Photoshop will examine the surrounding area and create its own texture based on what it thinks the good texture should look like.
When there isn’t enough good image data for Proximity Match to work, try the Create Texture option.
I’ll continue clicking around the image to remove the remaining pimples. Here, once again, is how the photo looked originally:
The original untouched image.
And here’s how it looks after quickly retouching it with the Spot Healing Brush:
Who needs skin cream when you’ve got Photoshop?
Was I able to fix every problem with the Spot Healing Brush? No. It’s hard to see in the screenshot, but there’s a couple of larger scars on her forehead and chin that would be a better match for the regular Healing Brush. However, with nothing more than a couple of minutes of my time and a few clicks of the mouse, Photoshop’s Spot Healing Brush was able to do a fantastic job of removing the girl’s acne and leaving smooth, healthy looking skin in its place.
And there we have it!
Written by Steve Patterson. 
photoshop essentials